")
Prerequisites
- There aren't many things you need, but an ilvl 119 job is preferred to speed things along. Dual Wield jobs with movement speed abilities are the best. There's a lot of running around, so consider having either THF, DNC, BRD, COR, or SMN (Garuda) before doing them. If you have it, the 2% movement speed cheer effect from Jumbotender (Monster Rearing) would be a nice bonus. This content is old, so you won't need to be seriously geared to defeat monsters. Some way to heal yourself (like /dnc Curing Waltz) is necessary.
Note: There are at least two Assaults where being a COR with Bolter's Roll is essential if you want the best chance of success. You can attain the maximum 60% movement speed for many minutes at a time with a simple Bolter's (5 or more) and Crimson Cuisses.
- Level 1 Weapons with decent delay are useful for some Assaults. Consider buying special Ambuscade weapons for this purpose. They can be stored away on Storage Slip after use. Other level 1 daggers include: Qutrub Knife, Esikuva, Norgish Dagger, Wind Knife, Aern Dagger, Infiltrator, Ceremonial Dagger, Chicken Knife II, Trainee Knife & Trainee's Needle -- If any of these are somehow impossible to attain, buy two Bronze Daggers for 146 gil or 50 sparks each.
- Don't forget Sanction for points. Set your Home Point at #2 outside the Commission's Agency if you want to save seconds by using a Warp Ring after fully exiting an Assault.
- Using daggers? Get yourself a Blurred (preferred) or Oynos (outdated) Knife for Haste. You'll appreciate the extra attack speed because you cannot summon trusts in Assault. A definite time saver.
- Super important to get the key item "Rhapsody of Azure" by beating Rhapsodies of Vana'Diel mission 1-16. Quality of life bonuses (like less wait time for tags) can be found in the link.
- If you are building a Mythic, bring your journals along. You must trade the right journal to each Runic Portal to get a star (*) added. Check this has worked, because sometimes it doesn't work if you hit the Treasure Chest and trade the journal too soon.
You will know when it works because you are handed the journal back like it was obtained again. Failing to do so before exit means having to do the Assault over. After completing a journal, Paparoon will take it from your inventory if you trade it.
Tip: Don't forget that Wide Scan is your friend if you're struggling to find enemies. Also, Windower's FFXIDB mini-map will help you find enemies (red dots) and key events (green dots) long before you can see them.
You can search for assaults by using CTRL+F and typing the following initials:
*PFC* (Private First Class)
*SP* (Superior Private)
*LC* (Lance Corporal)
*C* (Corporal)
*S* (Sergeant)
*SM* (Sergeant Major)
*CS* (Chief Sergeant)
*SL* (Second Lieutenant)
*FL* (First Lieutenant)
*CAP* (Captain)
Leujaoam Sanctum
*PFC* Leujaoam Cleansing (Remove all threats): Easy one. Kill all 15 worms. Take the North route first to complete this quicker.
*SP* Orichalcum Survey (Discover orichalcum ore): One of the toughest Assaults because of the luck factor! I did not find Field/Workers gear to be useful, although it's impossible to tell. This favours Corsair, because if your Pickaxe breaks after falling through a hole or off a cliff, you can Bolter's speed back to Mulwahah. Get used to running the stairs because every second counts! Also, don't forget to get the Pickaxe Temp Item from him before you start.
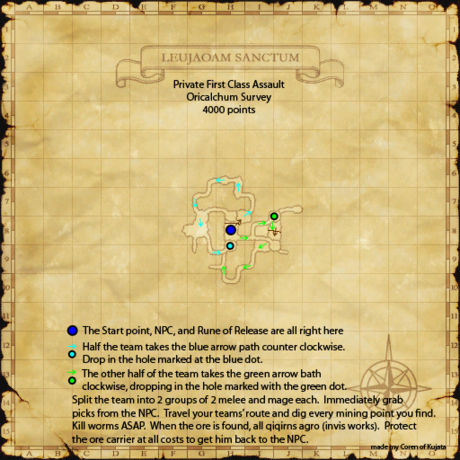
The sheer luck factor means you could do it several times before finding the Orichalcum Ore. I'm not kidding... it really is that bad for a solo player. Don't be ashamed to bring a friend along, because it will severely increase your chances of winning.
If you must solo, then I recommend going East at the start (green dots on the above map) and mining all the points you can in range of Mulwahah. After those are exhausted, fall down the nearby hole in the North East passage and do as many as you can before break. After going back to Mulwahah, fall down the cliff to the North (light blue dot path). Be ready for a LONG run if your pickaxe breaks around here! Sometimes it can break after just one use... it happened to me.
Mining Points can respawn in more friendly areas to the East of Mulwahah, so if you go the North route, don't immediately fall back that way after getting a new Pickaxe. I stress that every second counts. Don't waste time or you will feel it later.
*LC* Escort Professor Chanoix (Protect the professor): An escort quest? Ew. Don't assume you need /whm to Protect/Shell and heal this random professor (who has no idea where he's going) though, because it's not difficult to run ahead and kill any skeletons/ghosts in his path.
*C* Shanarha Grass Conservation (Protect the vegetation): You have to protect vegetation from the bunnies, and sadly they cannot be picked up on Wide Scan. The quicker you kill them at the start the easier it is, because they will run away from you after a while. They go in North and South directions and take breaks along their paths to vegetation, so it shouldn't be too difficult.
*S* Counting Sheep (Buy black sheep): This is random, but easy. Get some tools from two of the Qiqirn's, mine for Bronze, Silver, Gold pieces, and harvest for food. When you have as many as you can, trade them with the Qiqirn's. You shouldn't need to bother with the gambler. One of the Shepherd's will want a random food item or paying in money, so when it is compensated it will start following you.
Take the Shepherd to an Ice Wall and watch it plant a mine. Once you are through, find a sheep and click on it so it disappears. You only need one to finish. Repeat these steps if you want more AP, otherwise you can end this.
*SM* Supplies Recovery (Retrieve the supplies): This is possible to fail if you are not quick and unlucky with Imps dropping supplies. There are three Imps in the first big room, so take those out quickly, then head south west and take out the next two in the corridor. There are a few more further on, but the Blue Mage duo may have a supply by now, and you need several to ensure they can't get more than you.
*CS* Azure Experiments (Become a test subject): Talk to the NPC, get your "enhancement", kill the Lamia's that spawn. Do this a few more times. The NPC will follow you around, so wait for her after each set of Lamia you kill. Use Wide Scan to find each wave.
*SL* Imperial Code (Retrieve the OGMA): You can fail if you do not take care with the Kudagitsune (Bhoot). These blue ghosts can do a move called "Perdition". If you are stood close (less than 8 yalms) and even if you're i119... it can KO you. I forgot about this and didn't have Reraise on. So if you can't avoid aggro, at least pop a Reraise item.
The objective here is to avoid them entirely and kill three Ninja bosses (Oko, Danzo & Saizo) and click the ??? which spawn in their place. Their Kusa friends are nothing to worry about. Use Wide Scan to find the bosses.
*FL* Red Versus Blue (Defeat Raubahn): Talk to Shailham before going anywhere, otherwise the enemies will not spawn. Your Red Team will begin advancing, but you do not need to stay with them. Head to the very North of the map (ignoring other Blue Mages) and you will find Raubahn chilling at the back of a group of his merry blue men. You only need to defeat him to end this.
*CAP* Bloody Rondo (Defeat the count): Defeat the Vampyr.
Mamool Ja Training Grounds
*PFC* Imperial Agent Rescue (Rescue the agent): This used to infuriate people! But it's not as tough as some think. Bring level 1 weapons and a way to heal yourself (Dancer subjob is enough). Round up a bunch of Mamool Ja and take them to a door. Line them up so any Firespits or throwing moves hit the door, especially the target you are currently fighting. Do not weapon skill. The point of this is to encourage them to do TP moves.
After four Firespits or one throwing move connects with the door, it will crumble. Hit the pot hatch inside. You may need to take your Mamools out of the room for a moment, just to confirm if Brujeel is inside. If so, dialogue will appear and the mission will end shortly after. If not, go to the next door and repeat til you find Brujeel. Try not to kill too many Mamools as they do not respawn.
*SP* Preemptive Strike (Destroy the assassins): There are 13 Mamool Ja to kill and Puks can be ignored. Be careful about dropping down if you do not have a ranged attack or spells, because some Mamools are up on ledges that you cannot get back too if you fall to the floor.
*LC* Sagelord Elimination (Defeat Sagelord Molaal Ja): You can find Sagelord chilling in the area to the North. Get some TP on some other Mamools, then run up and Weapon Skill it. Knocking Sagelord down to 1% will make it spout some dialogue before warping out. If you don't WS, you risk it popping "Flee" and running around the area like a lunatic.
There's a chance that if you WS Sagelord to 1%, it will run away. If this happens, track it with Wide Scan, hit it a few more times, and it should warp out shortly after. Be aware it may take several seconds for the Assault to register the mission as complete.
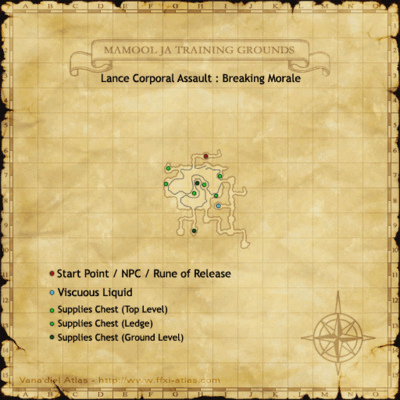
*C* Breaking Morale (Steal the supplies): Use Invisible, find a chest to receive supplies, and return to the start. You only need one! I get mine from the ledge to the East, but any will do. After giving supplies to Quhaaja, interact again to "Give Up" so you can finish the Assault.
If you get spotted and warped by a Trainer (true sight), you can return to the start easier by clicking on the Viscuous Liquid to put on a Mamool costume. Trainers will not spot you while wearing it. However, be aware that it drains HP and will KO you if worn for too long.
*S* The Double Agent (Apprehend the spy): If you have kids, this is one you could involve them in. You talk to the Qiqirn's to figure out who is the liar. Ask around and gather intel on who the actual spy is. If you don't care about AP, you can choose as many spies as you want as the culprit without failure. But where's the fun in that?!
*SM* Imperial Treasure Retrieval (Recover the treasure): This is good practice for another, much tougher Assault in another area. All you need to do is find one coffer, get a jewel out of it, and bring it back to the start. Sounds easy, right? The difficulty comes with the fact that the NPC Mamool Ja's will chase you if they see you with a jewel.
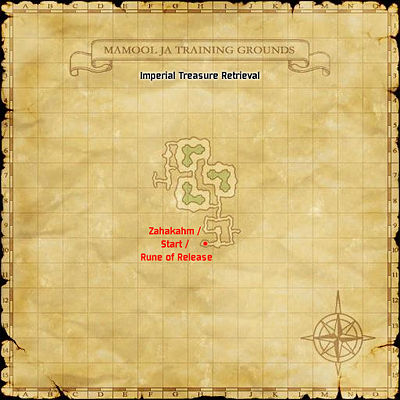
If they "tag" you, then you will lose it. Don't be afraid to take huge detours to avoid being tagged, or take notice of how many supplies they are stealing. The only thing that matters is you find a way back to the start with one jewel, which is enough to complete this. I get mine from I-7.
*CS* Blitzkrieg (Annihilate the enemy): This is fun! Kill 200 super weak enemies and win. If you can find a nice small passageway, you should be able to kill and auto target on to newly aggro'd targets, rather than having them running around you in circles.
*SL* Marids in the Mist (Neutralize the marids): Find Marids. Kill Marids. Win.
*FL* Azure Ailments (Gather pathological data): Get your low level weapons again because Azure Ailments highly encourages it. Not only that, but take out all gear with any Evasion and Magic Evasion. Why? Because Evasion means your targets hit you less (therefore less TP), and Magic Evasion stops you being enfeebled.
It is crucial you are enfeebled with three different status effects (not all at the same time) and feed them to the Soulflayer NPC Garjham. Equipment with Defense and Damage Taken is acceptable. There are many targets to pick from. The Pit Lundworm raptors to the East can give you two. "Foul Breath" gives Disease, and "Chomp Rush" induces Slow (although the latter kept missing my THF). To the south, Huge Spider's "Spider Web" gives Slow if Chomp Rush doesn't work.
The closest enemies to Garjham are leeches to the North, although the "Acid Mist" Attack Down move is rare. You might need two or three Leeches to see it. Aside from that, Poroggo is another you can rely on for their Bio. It's an easy one if you under power yourself and do away with all Magic Evasion.
*CAP* The Susanoo Shuffle (Defeat Oroch): Defeat the Hydra.
Lebros Cavern
*PFC* Excavation Duty (Remove the obstructions): Back in the day, I always found this to be very relaxing for some reason. It's simple though, find Brittle Rocks and destroy them. Don't forget the sneaky one at G-6. Also, the Runic Portal is way back at F-10, so save your Flee for the long run.
*SP* Lebros Supplies (Deliver the Provisions): One of the worst Assaults in the game to solo. Seriously, if you have any friends at all, or know anyone who is also getting Captain Rank/Mythic, team up on this because it is a real pain in the backside. If you have no accomplices or like a challenge? Then here's how I go about getting it completed. I have only ever beaten this on Corsair with Bolter's Roll.
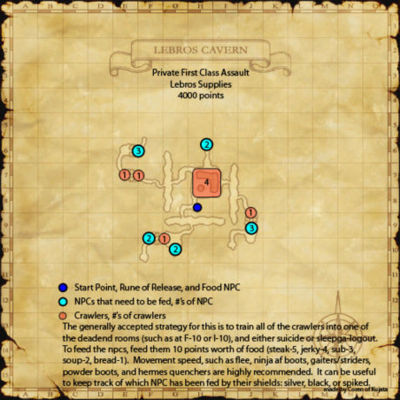
The aim is to reach a tally of 7 points for each soldier so they can be adequately fed. Each time you click a soldier with a food item, they will be automatically fed. You only get one food item at a time from Yazuhma. Sometimes, she is annoying and won't hand out the best food, which can make or break your run. Preferably, you want two Seafood Stewpots so you can feed the groups of three to the West and East. This does not always happen, though.
Each solider needs 7 points to be full. Try to memorize food values before you start. Here are the values for each:
Seafood Stewpot: 7 Points + AoE effect that covers the entire group the soldier is part of.
Bison Steak: 5 Points.
Coeurl Sub: 4 Points.
Bison Jerky: 3 Points.
Pea Soup: 2 Points.
White Bread: 1 Point.
Crawlers aggro by True Sound, but only if you are close. They have a good amount of HP, so killing them is only advised if you can do so quickly. In some cases, it is better to avoid them and keep your Roll as long as possible, but it may eventually become unavoidable. Be ready to kill fast and reapply Bolter's.
I go for the South soldiers first, just because it's the easiest Crawler to avoid. If at any point you get a Stewpot, you must go to the West or East camp to get them fed. You've got to make this up as you go, while remembering the values for each soldier you have fed. You don't have time to be writing it down, so you need to use memory.
When I get to a camp I always feed the spike shield Soldier's first, so I can remember my values easier. I do the Gold Bucklers second and Balance Bucklers last... but you can do this how you want. Try not to overfeed them. For example, if a soldier has three points, he only needs four to be satisfied, so wait til you get a Coeurl Sub to feed him. Don't use a Bison Steak on them, because you could put the five points in to someone else.
Movement Speed, getting around corners, killing/avoiding crawlers, having a good memory, and sheer luck, are all contributing factors to winning this challenging Assault. There is no shame in asking for help on this one!
*LC* Troll Fugitives (Destroy the Troll fugitives): Find and kill all the broken Trolls, all of which have less than 100% HP. Wide Scan is advised.
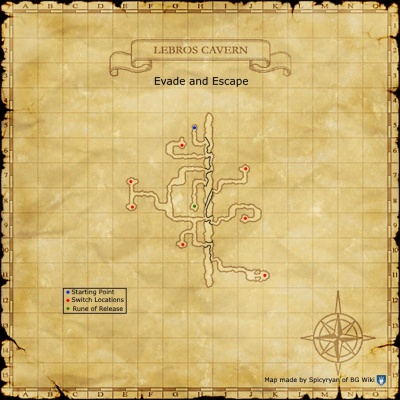
*C* Evade and Escape (Discover alternate route): Find the three randomly placed switches and click them all on within five minutes of each other, or you have to start over. It makes sense to find where they are first, then pop Flee and turn them on. Don't worry about the Dahaks, they are easy to kill.
Sometimes the switches are far away from one another, and even with Flee, it may prove difficult to do within the time limit. If you're not naturally quick, I'd suggest changing to another job with extra movement speed (BRD/COR/DNC/SMN) or bring a friend to stand at one of the switches.
*S* Siegemaster Assassination (Assassinate Borgerlur): Borgerlur is disguised as an Old Troll and it's impossible to tell which one, so simply kill all you can find til he is revealed. If you take too long, the Old Trolls will respawn, so don't let that happen.
*SM* Apkallu Breeding (Match the apkallu): Luckily, this isn't as annoying as the other Apkallu Assault in another area. Ok, so you only need to match one male with one female to complete this. Head to a male area, talk to an Apkallu and match the S+Q's to the one shown on the map below. Depending on who it is, you then need to escort this fella to his compatible mate:
Blue - Sky
Cod - Fish
Heat - Fire
Moon - Star
Orange - Apple
Rain - Cloud
Snow - White
Song - Sound
When you get to the area there may be several female Apkallu together. Click on them til you find the one you are looking for and match her with your male. Once love is in the air, you are done here. Talk to the Mithra to end this.
*CS* Wamoura Farm Raid (Remove the threat): Kill the Wamouracampa. If you take too long, some might evolve in to Wamoura. Use Wide Scan to track them down. Kill all targets and you win.
*SL* Egg Conservation (Drive out the hunters): It's like Campaign, only this time you are protecting Apkallu from small waves of Qiqirn's from the west and east sides. The rats take some time to respawn, so be patient and alert.
*FL* Operation: Black Pearl (Rescue Princess Kadjaya): This one catches some players out because there are mechanics they are unaware of. First, the crucial thing is no monster hits the Princess or it's game over. Second, You have three protectors guarding the three paths, and each will call out when a wave of monsters is incoming. You can Protect/Shell and cure these NPCs if you want. It's best they are not allowed to die. All it takes is one hit on the Princess and her guardians can take a few hits at least.
Third, each wave contains a Troll Combatent or two. Do Not Kill These Together! When a Combatent dies, a new wave immediately spawns and charges down a randomly chosen path. So it's best to kill the wave you are on without using AoEs, and when there are only Combatent's left, kill only one and leave the other to attack you while focusing on the next wave. Beware of auto targeting! I should warn that you will often have two waves of enemies coming at you. Meet one of them to aggro, and then run to the other wave to kill them together. This may catch out solo players early on and result in a loss. Be proactive and go to the mobs. Do not wait for them to come to you, or you could end up in a tough situation.
After a while of repeating this, the Princess will speak up and warn of an incoming NM called Jorporbor the Hellraker. It appears quickly after the warning and running at Flee speed. Be ready to claim before it reaches the princess! I recommend bringing a quick way to get the NM's attention (eg. Dia or Stun), although it will aggro if you happen to be in its path. This is the toughest part of the Assault, so if you're struggling to stop the NM, ask a friend to come along to serve as guard duty. Once it is defeated, all other monsters despawn and you win.
*CAP* Better Than One (Defeat Black Shuck): Defeat the Cerberus.
Periqia
*PFC* Seagull Grounded (Escort the prisoner): Excaliace is a douchey Corsair, but it's not a bad escort quest. Stay close to him. If he does run off, do not allow him to escape. You also need to stay behind him, because if you go ahead, he doesn't like that and will stop in his tracks. 1-3 yalms behind is acceptable.
Along the corridor he will enter rooms for no reason at all, and he picks them at random. When he encounters monsters he will run away. You have time to kill one or two, so long as you have flee or movement speed to catch him up... he runs pretty fast. It might be worth going ahead to kill monsters to avoid this.
When you catch up, get in front of him or he won't stop. The annoying part is figuring out what to do when he says you smell of garlic; hinting at some "social distancing". If you stand too far away, he will assume it's his moment to escape. If you stand too close, he will just repeat the fact you stink. I found the sweet spot to be 5-6 yalms. If you stand nearby, but not too far away, he will like that and continue on his path. Get used to this, because there's another escort assault which makes this look like child's play.
*SP* Requiem (Destroy the undead): All you need is to kill the undead and you win. Do not try getting through the doors as they are sealed.
*LC* Saving Private Ryaaf (Find the survivors): You need to find three NPCs and two fomors are disguised to fool you. But it's not much of a trap because they are easily defeated. You won't fail if they are spawned. If you want, there is a way to tell them apart.
Fomors will always face East, so unless you go to the East Room, this is a dead giveaway. However, some NPCs can also look East depending on the pattern used. See the BGwiki for the table if you are interested, but it's not a big deal either way. There are five possible locations, the North, West, East, South and Center.
The biggest giveaway is if you're using the FFXIDB mini map. NPCs will appear as green dots, while Fomors appear red. Kinda destroys the whole point of the Assault, but there you go.
*C* Shooting Down the Baron (Eliminate the Black Baron): To be safe, get some TP on Pugils, TP Roll, Regain, Meditate, or any other method so you have enough for a Weapon Skill. Black Baron can teleport around the zone if you do not kill it quick enough, so after you find it (doesn't show up on Wide Scan), smash it in the face to complete.
*S* Building Bridges (Activate the bridge): For fans of Metal Gear Solid, this shouldn't be anything you haven't seen before. But for newbies to the art of tactical espionage, allow me to share as many tips as I can.
I'm going the extra mile by making my own map, adapted from FFXIcyclopedia's. Many players struggle with this, so don't feel disgruntled if it takes many attempts. To make it tougher, I'm doing this on THF with 20% movement speed (I could be on COR with 60%). Why? To prove it can be done.
Forgive my epic Paint skills. One of the worst things about this Assault is you only have 15 minutes to click on four switches and reach the end. So we have an average of 3 minutes to hit each milestone. As you can see from my rainbow pathing, I like to go to the South switch first, and work my way around anti-clockwise.
During today's run I went 1/1 and that's not a brag. It really wasn't as simple as you think, and I based the map on what happened:
1) The first hiding spot is essential, so get used to how that works. The second is along the red path and at least two Lamia come by here. It's best to follow Lamia's if you can, but you never know when another will come the other direction. If you're struggling to reach #1, keep practicing because your next attempt will benefit.
2) On the orange path, you can see how I circled around in H-9. That was to avoid a Lamia. It's perfectly fine to do things like this to avoid aggro. Once I got away I headed quickly over to #2, but it was a close call. Much of the pathing requires timing down to the second, which is why more movement speed is lovely.
3) It took a while to get out of this area, because two Lamia make it tough to head North East to #3 along the Purple path. Be patient, because you can't afford to be warped back after making it this far.
4) I go this way along the pink path because a Lamia circles the North East area in a clockwise fashion. At this point, I had not been warped and had ten minutes remaining. But this is where it gets even more difficult.
5) The black path was a dangerous, bold move by me to reach the exit quickly. And it's tricky because there are 3 or 4 Lamia working their way around this area. There might be a hide spot around here but I didn't get to one. Yes, I was warped back to the start from the H-8/I-8 border.
6) I wasted the next five minutes trying to go along the Blue path and was warped twice. There was maybe one or two attempts left to get this in the bag. Luckily, I found the hide spot to the west of the Runic Portal and watched a Fatedealer float by. After that, I quickly ran around the corner and made it in time.
There is no shame in failing Building Bridges because it is one of the toughest Assaults. Movement speed, having a plan, knowing when to run, making good use of hiding spots, and keeping calm is the best way to finish this nightmare.
- On April 21, 2025, I added the following video to the guide. It is unrelated to the run I mentioned above.
In the video, I purposely handicapped myself by 1) using THF instead of COR/BRD/DNC/SMN, and 2) unloading the FFXIDB minimap. Having extended movement speed and a minimap makes this significantly easier. Not everyone has these, so I wanted to show it is possible.
YouTube Video Placeholder
*SM* Stop the Bloodshed (Exterminate the chigoes): Kill 35 Chigoes. Most of them can be found in dead end rooms. Be sure to check on top, and around the back of cages. Lamia are not needed.
*CS* Defuse the Threat (Clear the mine fields): It is very much like the Chocobo Hot and Cold game from FFIX, but with bombs. When you get in range, you'll have a limited time of getting close to the bomb so you can target it to deactivate. It is believed you need to defuse at least one to get the win. Discover all 15 to end the Assault, so remember where you have traveled.
*SL* Operation: Snake Eyes (Locate the generals): Another easy one. Kill the Qutrubs to open the locked gates. Find the Merrow 16 fighting the General before she dies. Destroy Lamia 14 to open the next gate. The only part you can fail is the last.
General Umarid is charmed and will fight you. DO NOT KILL HIM. The best way to avoid killing him is to take off your weapons and punch him to under 50% so Lamia 17 appears. Switch target to Lamia 17 and kill it to end the quest.
*FL* Wake the Puppet (Retrieve the Mark-IIs): There are four emotes you will need to remember for this.
/salute activates a Puppet
/clap moves a Puppet to your location
/hurray turns the Puppet in to offense mode
/goodbye deactivates a Puppet
You need to escort four Puppets to the starting NPC from their rooms. The easiest way to do this is to activate a puppet, turn it in to offense mode, attack a Wight, bring it to the puppet, then drag the Wight to the starting NPC as the puppet fights.
If done right, the Puppet will follow you and the Wight back, without the annoying gimmick of keeping its emotions in check. Beware of other Wights distracting it along the way. If they do, attack any aggro and drag it to the NPC.
Once there, kill all Wights and deactivate the Puppet to consider it returned; the name will turn green when it has. Also, let it be known that if your Puppets are close to death, you can heal them up with Curing Waltz.
*CAP* The Price is Right (Assassinate King Goldemar): Kill the Dvergr
Ilrusi Atoll
*PFC* Golden Salvage (Recover the figurehead): Look around for chests. The wrong ones will transform in to Mimics when you get close, so you know you have the right one when it doesn't.
*SP* Lamia No.13 (Eliminate Lamia No.13): Do a wide scan, find Lamia 13 and kill it.
*LC* Extermination (Exterminate all monsters): Kill all enemies. One of them will randomly come back as an "undead", so watch out for that.
*C* Demolition Duty (Demolish the shipwrecks): Talk to the NPC at the start to get an Automaton to follow you. Yes, you do not have to use one because it's possible to take down blocked paths with AoE WS and spells (only by using them on enemies), but you can't begin the Assault properly without talking to the NPC.

I found that Imps don't last long enough to get good TP on, so it's probably best to get an Automaton anyway. Just be careful not to run too far away from it, or it will turn in to a NPC and "reset" itself. In other words, it will despawn and you have to go back to the start for a new one.
*S* Searat Salvation (Save the Qiqirn Divers): This can be quite difficult and frustrating, but just remember you only need to get one Qiqirn to the end to earn a pass.
There are places you can hide, and much of it boils down to good timing, but one thing you need is good movement speed. If Qiqirn's get scared, they run away with incredible speed and can go very far. You should recover them, especially if it's early.
Use your Wide Scan to locate any you have lost. I had a tough run after getting to H-5 as they spread out across the map. Somehow, I managed to find one and escort it to the end in time. Stay patient, make good choices, and it should be fine.
*SM* Apkallu Seizure (Capture the apkallu): Here we go. Seriously, if you have never done this before, or you have tried and would like some tips to get you over the line, watch the video. Practicing the technique is crucial. Don't get upset if it takes many attempts, because there are strict conditions which aren't easy to pull off.
YouTube Video Placeholder
*CS* Lost and Found (Find the ring): Players can sometimes struggle here. It's not too bad if you understand when Tian Tian says something is there, you need to move around inch by inch while scanning around for new targets. In the beginning, she will only help you look for clues, and the ??? targets are hidden til you are next to them. I find that targets disappear if you are directly on top, but will appear if you are standing still 1-3 yalms away.
Getting the first clue early is a major help. Not only that, but if Tian Tian talks about something being nearby, narrow it down until she says it's "very close". When she says that, the ??? target is as she says. She does not take cliffs or walls in to account, so if there is a ledge nearby you might want to check it out. Search quickly and efficiently, because the ??? will often give an enemy or seaweed. Bring a way to dispel the gravity effect from seaweed.
After getting two clues, she will begin pointing you in the direction of the ring itself, and the target for it works differently. As BGwiki says, you have to be within 1 yalm for it to appear. Therefore, it's almost impossible to stumble upon it by accident. Put all your efforts in to finding at least two of the clues. Three makes it even easier, but isn't necessary.
This is another case where bringing friends makes it significantly easier. But if you can't do that, don't feel bad about failing this tricky Assault a few times.
*SL* Deserter (Locate the agents): All you have to do is break the weapon of one Lamia or Merrow. I used my low level daggers & Mummu gears, and it worked like a charm on the first Lamia. This isn't necessary, but underpowering yourself means you won't kill them too quickly. Critical hits give more of a chance of a break happening.
When you do this and return to Raubahn, he will ask if you want to "Abort Mission". Don't be alarmed like I was. If you abort the mission with one weapon broke it will count as a win. Other Assaults simply ask if you want to "End The Mission", so that's why it threw me off.
*FL* Desperately Seeking Cephalopods (Collect ahtapot): I'm not a fan of fishing, but this Assault requires you fish successfully. No, you don't need any fishing skill or equipment other than a rod and bait. While you can get fishing gear by defeating Qiqirns, it is encouraged to bring your own to save time. If you have never fished before, the mini-game takes some getting used to. Remember to press the action button when you deplete your catch's HP bar to zero.
Start off by finding an NPC. I go to Bhjaama as they are closest. Fish up 4 or 5 enemies and kill them. Next, you will talk to the fisher NPCs, starting with the NPC you are closest to. You need to find someone who is really enjoying their day of fishing. Their enthusiasm is a clue that the Orobon could be nearby. Fish next to the happy fisher til you either find the Orobon, or you have killed 5-6 more enemies. Talk to the happy fisher again and their message should have changed. They will guide you to the exact place the Orobon can be fished.
This Assault is tough on time. Sometimes you can fish for the entire 30 minutes and still not catch the Orobon. Or you can fish for a few minutes and get it right away. Like Lost and Found, it is entirely luck based. The only way to increase your chances is to use your time wisely. Doing the following will help:
1. Having Flee or another form of extended movement speed is encouraged, because NPCs are far away from one another. Also, bring a way to cast Invisible, as the last thing you want is to waste time aggroing the Qiqirns.
2. When you have fished up 5-6 monsters at the happy fisher, their message will change to tell you where you should fish for the Orobon. Each NPC has three or four locations, including staying with them. The following information on their messages is taken from the Assault's FFXIcyclopedia page.
Bhjaama: "I heard a rumor that the inlet to the east is teaming with 'pots. Just a rumor, though..." - West side of (H-8)
"Something tells me that inlet across from here's ripe for the picking. I wonder if I should move..." - Southwest corner of (G-8)
"I've been hearing splashing all about the area near Ulbuun. Might be a school of 'pots... Never know..." - In the area around Ulbuum
Walagarim: "That little inlet behind me used t' be mighty popular back in the day. Why not try yer luck there?"
- (H-7) not far behind him, in the little inlet on the same side he is fishing. You should still be able to see Walagrim.
"If ye ask me, that inlet all the way to the north looks mighty keen. I ain't leavin' this hole, though." - (G-6) at the far north end of the north corner of the north inlet.
"Scram, <missie>. There's a good spot t' the left of me, yonder." - Can be fished left of the npc, past the bridge entrance, not across it on the island. If you fish too far south the Qiqirn on the island across from you can aggro.
Zawahf: "You see the inlet directly across from me? You will find that it is alive with ahtapot." - Inlet top middle of (H-9)
"I do not know what could be wrong... My research has never led me astray before..." - Continue fishing around Zawahf.
"Let me give you a piece of advice--the inlet behind me is teeming with sealife. Why not go and see for yourself?" - Inlet just north of Zawahf.
Zshahda: "Zshahda thinks this inlet smells like ahtapot..." - Fish next to Zshahda.
"Zshahda's lonely... All her ahtapot friends are swimming in the southern inlet..." - Fished at (I-10).
"Zshahda wants to fish at the inlet across from here..." - Fished at (I-9) directly in front of the pathway that goes towards (J-9).
"Zshahda thinks inlet to the left might be better than this one..." - This refers to the indent on the east side of (H-9).
When you fish up the Orobon and kill it, take the Ahtapot to the start NPC to find the Runic Portal.
*CAP* Bellerophon's Bliss (Defeat Khimaira 14X): Defeat the Khimaira. You may need to attack the Moblin leader Martial Maestro Megomak til he warps out.
~~FIN~~