FFXIAH.com


Sigurd's Descendants: The Art of Dragon Slaying

I made this guide so all Dragoon's can come together in one place and discuss how to help our community and push us forward into the limelight. From starting the job for the very first time or discussing the most optimal gear choices, all culminating in an effort to improve ourselves and others.
Table of contents
1. Introduction
2. You've Chosen Dragoon!
2. 1. Getting Started
3. All things Dragoon
3. 1. SP Abilities
3. 2. Jump Abilities
3. 3. Pet Commands
3. 4. Other Job Abilities
3. 5. Job Traits
3. 6. Merits
3. 7. Job Points
4. Choose Your subjob
5. Weapons
6. Weapon Skills
7. Gear Sets
7. 1. Gear Sets For Ryunohige
7. 2. Gear Sets For Gungnir
7. 3. Gear Sets For Returning Players
7. 4. Other Gear Sets
8. Resources
1. Introduction
So if you've chosen Dragoon, basically you have decided to be the underdog! lolDRG has been a running joke for the last 11-12 years I've been playing FFXI. It does not have the raw damage of WAR/DRK/SAM or the versatility and defensive capabilities of MNK, so what exactly does it have?
Well it has always been a great "utility" job: With Stardiver's Critical hit defense -5% and Angon's unresistable Defense -25%, it has always been a great addition to party or alliance content. As the developers have finally given DRGs what we've hoped for with an upcoming Attack +20%, we now may have stepped into the higher DD realm.

2. You've Chosen Dragoon!
Hi! So you're new to the game or maybe you are just recently gravitating towards Dragoon? Well no problem everyone is always curious to know what RME armor they should worry about first! Especially if you're on a tight budget. These are my recommendations for Gear priority & which should be ILvl 119 or simply ILvl 109 (again if you're on a budget).
Empyrean Armor +2: #1 Lancer's Cuissots -> #2 Lancer's Plackart -> #3 Lancer's Schynbalds -> #4 Lancer's Vambraces -> (Currently #5 will most likely go straight into storage/mog slip until the Empyrean armor reforge.) #5 Lancer's Mezail.
Artifact Reforged 109/119: #1 Vishap Mail +1 -> #2 Vishap Finger Gauntlets +1 -> #3 Vishap Greaves +1 -> #4 Vishap Armets +1 -> #5 Vishap Brais +1. I would recommend you 119 all of the AF Reforged set. The added offensive, defensive, and Wyvern HP stats we get are very good. Dragoon's do not have a array of gear to choose from when you compare their options to WAR/SAM/DRK options.
Relic Reforged 109/119: #1 Pteroslaver Finger Gauntlets -> #2 Pteroslaver Mail +1 -> #3 Pteroslaver Armet +1 -> #4 Pteroslaver Greaves +1 -> #5 Pteroslaver Brais. If the gear is 109; basically you will be using it for the EXP augment effect that you get automatically via reforging. 119 gear you will be utilizing in gear sets.
2. 1. Getting Started
Dragoon is an advanced job, so you have to unlock it by completing a quest: The Holy Crest.

3. 1. SP Abilities
 |
Spirit SurgeLevel 1, 1:00 base duration, 1:00:00 recast Your Wyvern must be summoned in order to use this ability. You will then absorb your Wyvern and gain these benefits:
Upon activation, the recast timers for Jump, High Jump, and Super Jump are reset to 0:00. Those abilities also have 100% hit rate while under the effect of Spirit Surge. The duration of Spirit Surge can be extended to 80 seconds by using Spirit Surge while having either of these items equipped:
|
Fly HighLevel 96, 0:30 base duration, 1:00:00 recast What Dragoons have always wanted. >_> Kinda... lol Resets recast timers of all Jump abilities and while under the effect of Fly High, Jump abilities have a recast of 10 seconds. On a scale from Lame to Overpowered, I would personally give this SP a "Good". Initially, most in the Dragoon community believed this ability would be similar to SMN's SP2 Astral Conduit, which means you would have 30 seconds to hit jumps with a 0 second recast timer... but I think when developers put deep thought into it, they decided that would be pretty overpowered. Still a "Good" SP. |
3. 2. Jump Abilities
Jumps have been a trademark ability of Dragoons since their introduction in Final Fantasy II. Using a Jump ability in Final Fantasy XI lets you deliver an instant attack around with Jump-specific bonuses. As such, multi-attack and additional effects can proc on Jump abilities, but dealing 0 damage means that you will not gain TP. Equipment that modifies TP gain for Jump abilities however still lets you gain the additional TP.
Also, as mentioned previously, using Spirit Surge resets the recast timers for Jump, High Jump, and Super Jump. While under the effect, those Jumps have 100% hit rate and they gain additional Jump-specific effects.
   |
JumpLevel 10, 1:00 recast (can be reduced to 0:50) Jump-specific bonus: Receives a base damage (+fSTR) multiplier of (1 + VIT/256). Spirit Surge bonus: Inflicts Defense -20% to the target. This effect does not stack with other forms of Defense down, except from Dia and Sluggish Daze (from Box Step). Jump is enhanced by these pieces of gear:
The effects of vishap greaves and vishap greaves +1 on Jump are currently being verified. |
|
High JumpLevel 35, 2:00 recast (can be reduced to 1:40) Jump-specific bonus: Sheds a portion of the user's enmity. A main job Dragoon loses 50% of their enmity; a player using High Jump with a sub job Dragoon loses 30% of their enmity. Using this job ability does not feed TP to the target. Spirit Surge bonus: Reduces the enemy's TP by a percentage proportionate to the amount of damage inflicted. High Jump is enhanced by these pieces of gear:
|
Super JumpLevel 50, 3:00 recast Super Jump does no damage to the enemy, it does not give TP to the Dragoon, and it cannot claim a monster. Jump-specific bonus: Resets the Dragoon's enmity to 1 CE, but only if the Dragoon is currently holding hate. While doing so, the Dragoon will remain in the air for 5 seconds and the Wyvern will perform a similar ability, Super Climb. Spirit Surge bonus: The closest party member behind the Dragoon, from the enemy's point of view, has their enmity reduced by 50%. |
  |
Spirit JumpLevel 77, 1:00 recast (can be reduced to 0:50) Shares a recast timer with Jump. Spirit Jump is an instant attack that receives three bonuses when the Dragoon's Wyvern is present:
Spirit Jump can be enhanced by using it while having these pieces of gear equipped:
|
|
Soul JumpLevel 85, 2:00 recast (can be reduced to 1:40) Shares a recast timer with High Jump. Soul Jump is an instant attack that receives three bonuses when the Dragoon's Wyvern is present:
Soul Jump can be enhanced by using it while having these pieces of gear equipped:
|
3. 3. Pet Commands
|
Call WyvernLevel 1, 20:00 recast Summons our Wyvern friend to fight by our side! The Wyvern's job traits can be modified with equipment equipped at the time of use. Any job trait modifications will persist, even if your equipment is removed, until the Wyvern dies, is dismissed, or the Dragoon zones. If the modifying equipment is worn while zoning, the job traits however will persist. Dismissing your Wyvern will reset the recast timer of Call Wyvern, if your Wyvern was at 100% HP. Your Wyvern cannot be summoned while you are under the effect of Spirit Surge; you will have to wait until Spirit Surge wears off. You can add support job traits to your Wyvern by using Call Wyvern while having either of these items equipped: |
DismissLevel 1, 5:00 recast If the Wyvern has 100% HP when Dismiss is used, the recast timer of Call Wyvern is reset to 0:00. |
  |
Spirit LinkLevel 25, 1:30 recast The Dragoon loses 25%-35% of their current HP and the Wyvern's HP is restored. The Wyvern also gains a Regen effect. Spirit Link cannot be used if the Wyvern has 100% HP. The merited job trait Empathy however lets you use Spirit Link even if your Wyvern is at 100% HP. Your Wyvern will recover HP following this formula: HP restored = 2 * [Player HP spent + MND + (Wyvern level * 0.7)] The Regen effect on your Wyvern will restore (Player level)/3 HP per tick for a total duration of 90 seconds. Spirit Link also can remove Blind, Paralyze, Poison, Doom, and Sleep from the Wyvern. Similar to player characters, your Wyvern will not wake up if Spirit Link is used while your Wyvern is at 100% HP. Using Spirit Link will transfer half your Wyvern's TP to you. With merits in Empathy, it can transfer buffs to your Wyvern. As of the September 2014 update, having 5/5 Empathy merits will allow a player to instantly gain the benefits of Attack +20%, Defense +20%, and Job Ability Haste +10% when using this job ability. Spirit Link can be enhanced by equipping these pieces of gear:
|
 |
Deep BreathingLevel 75 (merited), 5:00 recast Increases Wyvern Breath potency by 10% per merit level after the first. Using this ability doubles the potency and increases the accuracy of your Wyvern's next Breath. This effect stacks with the effects from wyrm armet and its upgraded versions up to vishap armet +1. I cannot really recommend this to a Dragoon. Nowadays, at this stage in the game, your Wyvern will be able to restore 1000-1500+ HP on NQ Healing Breaths with proper HP+ and HP+% gear sets. Depending on the September 2014 update, reducing the readying time of Wyvern Breath attacks from 3 seconds to 1 second might affect breath potency, due to server lag in recognizing HP+% swaps. The Deep Breathing effect can be enhanced by 10% per merit level by equipping either of these pieces of gear:
|
|
Smiting BreathLevel 90, 1:00 recast Forces your Wyvern to use an elemental breath. I personally do not use this ability, although I cannot say that there is no practical use for it. I would say it is few and far between. This could all change with the upcoming September 2014 update to Wyvern magic accuracy and Breath delay... unlikely though. |
|
Restoring BreathLevel 90, 1:00 recast Forces your Wyvern to use Healing Breath When SE introduced this pet command, all Dragoons rejoiced. It gave us the ability to not have to always use a mage or utility sub job to be able to heal ourselves! |
Steady WingLevel 95, 5:00 recast Grants a Stoneskin effect to the Wyvern equal to 30% of its maximum HP plus the difference between its maximum HP and its current HP. |

3. 4. Other Job Abilities
 |
Ancient CircleLevel 5, 3:00 base duration, 5:00 recast Gives party members in range the effect of Dragon Killer. When used as a main job Dragoon, these effects are granted to people affected by Ancient Circle:
Using Ancient Circle with a sub job Dragoon, it will grant +5% to each of those bonuses instead. If the Dragon Killer job trait is already present, its effect is enhanced by Ancient Circle. Wearing either of these items when activating Ancient Circle also enhances its effect, increasing its duration by 50% and its potency by 2%: Only one Circle effect can be active at any given time. |
 |
AngonLevel 75 (merited), 3:00 recast Reduces the target's defense by 20%, giving the effect of Defense Down. Increases duration of Defense Down by 0:15 for each merit level after the first. One of our best abilities and the reason why everyone loves Dragoons! The effect stacks with Dia and Sluggish Daze. It also overwrites any weaker Defense Down effects, e. g. from acid bolt, as well as weaker Defense Bonus effects. It however does not overwrite Defense Down from Frightful Roar or Spirit Surge'd Jump. This is the crème de la crème of our abilities and a must have. Don't forget to bring Angons to use this job ability though: It requires you to have consumables! Using Angon while having either of these items equipped enhances the Defense Down effect by 1% per merit level: |
Dragon BreakerLevel 85, 3:00 base duration, 5:00 recast Lowers accuracy, evasion, magic accuracy, magic evasion, and TP gain for enemy dragons. |
3. 5. Job Traits
Attack BonusLevel 10 (Attack Bonus I), Level 91 (Attack Bonus II) Gives us Attack +22 at level 99, which is not much by today's standards, but every bit helps. |
Dragon KillerLevel 25 Most of the Dragons in Vana'diel are Dragons in disguise at best, e. g. Puks, and the other ones are few and far between. So don't expect to see Dragon Killer proc often. |
Accuracy BonusLevel 30 (Accuracy Bonus I), Level 60 (Accuracy Bonus II), Level 76 (Accuracy Bonus III) Having Accuracy +35 natively at level 99 and an A+ ranked Polearm skill means that we are among the most accurate melee DDs out there. That allows us to focus on other things when gearing, neglecting accuracy (to a certain extent). |
Conserve TPLevel 45 It's nice to have, but the twofold random nature of Conserve TP makes planning around it not feasible. It can only save up to 200 TP, so unless you hit the high end of that range, Conserve TP will not grant you a 4-hit cycle. All it does is add some overflow TP to dump into Stardiver. |
StrafeLevel 75, merited Wyvern breath attacks got a magic accuracy update recently, so having Strafe merited means even less these days. Not like it meant anything before that to begin with. |
EmpathyLevel 75, merited This however is really useful at buffing your Wyvern. It copies buffs from left to right, as seen in the buff/debuff icons area in the top area of the screen, which means that Protect, Shell, and Haste are among the first buffs to be copied to your Wyvern. After the September 2014 update, this also lets you benefit from your Wyvern's buffs for you (Attack +20%, Defense +20%, Job Ability Haste +10%) instantly upon using Spirit Link. |
Critical Defense BonusLevel 85 (Critical Defense Bonus I) Not useless, but as with many defensive job traits that are not labelled "Magic Defense Bonus", there is not much to say about it. |
3. 6. Merits
Group 1 MeritsAncient Circle recast: Reduces the recast timer by 10 seconds per merit. Jump recast: Reduces the recast timer by 2 seconds per merit. High Jump recast: Reduces the recast timer by 4 seconds per merit. Super Jump recast: Reduces the recast timer by 6 seconds per merit. Spirit Link recast: Reduces the recast timer by 3 seconds per merit. Recommendation: 5/5 in Jump and High Jump each. Jumping for damage more frequently means more damage and more TP, which ultimately means even more damage, thanks to Weapon Skills. |
Group 2 MeritsDeep Breathing: Unlocks the Deep Breathing job ability. Increases Wyvern breath potency by 10% for each merit beyond the first. Angon: Unlocks the Angon job ability. Increases duration by 15 seconds for each merit beyond the first. Empathy: Grants buffs to the Wyvern when using Spirit Link. Copies one buff per merit and gives 200 experience points per merit beyond the first. Strafe: Increases Wyvern magic accuracy by 5 per merit. Recommendation: 5/5 in Angon, because that's what everyone loves us for. 5/5 Empathy is the other sensible one, but 4/4 Empathy and 1/1 Deep Breathing is fine, as well, if you insist on having Deep Breathing unlocked. Strafe however is just useless. |

3. 7. Job Points
I am by no means advocating for Job Points completion, if people feel like they are useless. I am not here to argue with you. I know people are not happy with the amount of effort it takes to cap these things. Minuscule increases to performance for that much hard work seems unfair to some and I understand that. These again are simply recommendations, if you enjoy obtaining Job Points.
Spirit Surge effectIncreases damage value of weapon while under the effect of Spirit Surge. 10/10 will bring this to +10 base damage added to your weapon. With the new Attack +25% bonus coming in the September 2014 update, this is highly recommended. |
Fly High effectIncreases the physical attack of all Jumps while under the effect of Fly High. Increases physical attack by 5. 10/10 will grant Attack +50 to all Jump abilities when used under the effect of Fly High. I also recommend working on this one. |
Ancient Circle effectReduces amount of damage taken from dragons while under the effect of Ancient Circle. Reduces damage taken by 1. I do not recommend actively working on this, because of its lousy effort:reward ratio. |
Jump effectIncreases the physical attack of Jump and Spirit Jump. Increases physical attack by 3. When coupled with the enhanced Fly High effect, your Jump and Spirit Jump will have an Attack +80 bonus. O.o If you have completed both, that is. |
Spirit Link effectReduces caster's HP consumption when Spirit Link activates. Reduces HP consumption by 1 percent. I also do not recommend actively working on this, because of its lousy effort:reward ratio. |
Wyvern maximum HP bonusIncreases the maximum HP of Wyvern. Increases maximum HP by 10. If you have finished the other three recommended ones (Spirit Surge effect, Fly High effect, and Jump effect), this would be the fourth Job Points category to work on for the time being. |
4. Choose Your Subjob
SamuraiThis sub job has been most Dragoon's go to sub job for the last couple of years. The two main reasons for that being Hasso and the Store TP job trait: Hasso's Job Ability Haste +10% effect helps getting towards the delay reduction cap of 80% in fully buffed situations and the additional STR is a nice bonus as well. Store TP helps reaching the 5-hit build everyone loves to have. Meditate, Sekkanoki, and the emergency button called Seigan + Third Eye are nice to have too. As of the September 2014 update, the introduction of the Wyvern-master partnership may have changed Samurai's role as the optimal sub job. If you are capping magic Haste with e. g. double March + Haste and keeping your Wyvern alive throughout the battle is feasible, Hasso will only add 1% to your delay reduction, so the main advantage of having subbed Samurai - getting significantly closer to the delay reduction cap - may not outweigh the advantage of other sub jobs, namely Warrior, anymore. Otherwise, Samurai still is the top contender for your sub job. |
WarriorPersonally, I remember seeing players sub Warrior during the prime VW days. After that, I haven't seen too many Dragoons utilize this sub job, mostly because of the loss of attack speed. Prior to the TP per hit change that happened with the Weapon Skill revamp, it was difficult to get a 5-hit build while subbing Warrior. As of the September 2014 update, Dragoons have their own source of Job Ability Haste +10%. This and the now feasible 5-hit builds for Dragoon mean that Warrior is the optimal sub job now, if keeping your Wyvern alive is practical. Berserk and the Double Attack job trait are great offensive tools, and if you happen to need some accuracy, Aggressor can help you out for a while too. |
Dark KnightThis sub job is a multi-purpose one, which means your Wyvern will use both offensive breath attacks and Healing Breath, which is great. Albeit it will use them at lower HP thresholds, even with your drachen armet (or higher) equipped, having it possibly save your life rather than not is always great. Along with that multi-purpose Wyvern, you also gain a slew of offensive capabilities. Last Resort is another source for Job Ability Haste, giving you another +15% in addition to your Wyvern. It also comes with an Attack +15% bonus. If you need some accuracy, Souleater can help you out for one minute. You will get some extra damage out of it, too! |
Blue MageBlue Mage is the sub job of choice when you are fighting anything that deals an extremely large amount of physical damage. It provides more physical damage mitigation than any other sub job through the use of Cocoon. Cocoon increases your defense by 50% and stacks with other defense increases including the 20% buff from your wyvern and protect. On top of this, Refueling gives you Haste, Foot Kick is nearly instant, and there are a handful of other useful spells to enfeeble the monster and further decrease the damage you take. /BLU allows you to set spells like Sprout Smack (Slow), Sandspin (Accuracy Down), Head Butt (Stun), Geist Wall (Dispel), Terror Touch (Attack Down), Awful Eye (STR Down), just to name a few. With proper gearing you should be able to land these spells about as much as you land enfeebles as /RDM. Sub Blue Mage does not allow you to set Refresh however. With /BLU you can also set spells to gain semi-useful traits like auto-regen and attack boost, as well as stat bonuses based on the spells you choose. If you ever find that you need massive damage mitigation and you can't use trust NPCs, Blue Mage is the proper choice. |
Red MageThis is one of our best defensive sub jobs we can use: Refresh, Phalanx, Stoneskin, and Haste all help us play very defensively for a long period of time. Having access to Haste, we can get up to delay reduction -50% without any other support. Stone is the best spell to activate Healing Breath, because casting it is very fast (even faster than casting Dia) and you only spend 4 MP for it. |
White MageThe main reason for a White Mage sub job is Reraise, teleporting, and status removal spells. The latter can be useful every now and then, especially if it is for things you cannot remove with Remedy. If you want to use this sub job, the best spell to activate Healing Breath is Dia. It is slightly more expensive than Stone though: 7 MP. |
NinjaSimilar to White Mage, there is only one reason for using a Ninja sub job over anything else: Utsusemi. (Well, it's two. But you get the idea.) Which however is a way better reason for a subjob than Reraise. |
5. Weapons
 |
RyunohigeThe ultimate weapon and the weapon of choice for Dragoon. Ryunohige is the best Polearm in the game. I haven't yet been able to create a situation where its Relic/Empyrean counterparts have come close. |
Pros:
|
Cons: Like Other Mythics the main con for Ryunohige would be AM3 Maintenance. During events where maintaining AM3 is impractical due to status effects which cause stripping of weapons (Encumbrance) it may be more beneficial to use another Polearm. |
 |
RhongomiantNow the best thing I can... say... please forgive me in advance, Rhongomiant owners. You can unlock its Weapon Skill, Camlann's Torment. Okay, yeah... |
Pros:
|
Cons:
|
 |
GungnirVery far behind Ryunohige, but closer to its other competitors and in situations where accuracy is an issue and Defense Down from Angon has worn off, keeping Gungnir's additional effect of Defense Down applied and maintained will let it pull ahead of other competitors. |
Pros:
|
Cons:
|
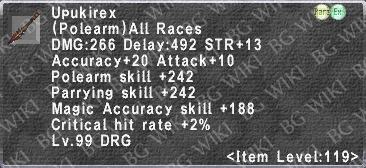 |
UpukirexObtained from Muyingwa, the final boss of Ceizak Battlegrounds Fracture. This Polearm helped bring Dragoons back with the introduction of Delve in 2013. It was just made so well. Upukirex stats are just hard to topple and you are easily able to outperform or stay on par with most Polearms in the game aside from Ryunohige. |
Pros:
|
Cons: Given its attainability, there are not many cons, if any at all. |
 |
KuakuakeitObtained from Colkhab, the Naakual of Ceizak Battlegrounds. For level 119 content and below, i. e. where accuracy is not an issue, this is the Polearm of choice, unless you have a Ryunohige. It's simply that great. This assumes you have augmented it with Occasionally attacks twice, which can proc on Jump abilities. |
Pros:
|
Cons:
|
 |
OlyndicusObtained from Mistmaw Xelhua, which can be found in the new Alluvion Skirmish in Cirdas Caverns. Simply put, this bad boy is quite a monstrosity that is all dependent on what augment you're able to obtain via the augmenting system. Being lucky and getting something like Accuracy +20, Attack +20, and Double Attack +5%~6% makes this bad boy shine. |
Pros:
|
Cons:
|
 |
AreadbharObtainable from Oboro in Port Jeuno after one of his tasks has been completed:
Trade Oboro one cehuetzi claw, one dark mezraq, one orichalcum lance, and 150 of either pluton, chunk of beitetsu, or riftborn boulder to get an Areadbhar after a short wait. |
Pros:
|
Cons:
|
 |
Eminent LanceObtained from a Record of Eminence NPC in exchange for 7000 Sparks. |
Pros:
|
Cons:
|
  |
Honorable mentionsThese two Polearms are very decent, but they are a tad bit weaker when compared with the higher end of item level 119 Polearms. |
6. Weapon Skills
Stardiver4 hits WSC: 73%~85% STR fTP: 0.75 (1000 TP) / 1.25 (2000 TP) / 1.75 (3000 TP) Skillchain properties: Gravitation, Transfixion Dragoon's absolute best Weapon Skill at this time. It scales very well with more TP and it can create Darkness with several other commonly used Weapon Skills from other jobs, e. g. Tachi: Fudo and Namas Arrow. Stardiver also reduces the target's Critical hit rate evasion for 60 seconds, which is equivalent to giving everyone attacking the target a Critical hit rate +5% bonus. Elemental Gorgets and Elemental Belts are the best options for this Weapon Skill, because fTP transfers across all hits, so use soil gorget, shadow gorget, or light gorget, as well as soil belt, shadow belt, or light belt accordingly. |
 |
Drakesbane4 hits WSC: 50% STR fTP: 1.0. Critical hit rate: +10% (1000 TP) / +25% (2000 TP) / +40% (3000 TP) Skillchain properties: Fusion, Transfixion Attack modifier: 81.25% With an attack penalty of almost 20% and the fact that SE completely ignored Drakesbane in the recent Weapon Skill revamp, Drakesbane has been unseated by Stardiver as the overall Weapon Skill of choice, even if you have a Ryunohige. This is not to say Drakesbane does not have its uses: When receiving any type of Critical hit rate buff or fighting fodder mobs, Drakesbane is still a Weapon Skill to utilize. Its Fusion Skillchain property allows it to open and close Light with many commonly used Weapon Skills from other jobs, the most relevant ones of those being Resolution, Victory Smite, and Tachi: Shoha. Drakesbane also opens and closes Light for Camlann's Torment. |
 |
Camlann's Torment1 hit WSC: 60% STR, 60% VIT fTP: 3.0. Defense ignored: 15% (1000 TP) / 35% (2000 TP) / 50% (3000 TP) Skillchain properties: Light, Fragmentation After the Weapon Skill update in 2014, this became a very solid and consistent Weapon Skill for Dragoons to use. Camlann's Torment receives an attack boost (by partially ignoring the target's defense), so it is very good to use when deprived of attack and/or on high defense targets. Being an Empyrean Weapon Skill, it has a Level 3 Skillchain property, which means it can open and close Light for a multitude of other commonly used Weapon Skills from other jobs, like Victory Smite and Tachi: Fudo. |
 |
Sonic Thrust1 hit, delivers an area attack WSC: 40% STR, 40% DEX fTP: 3.0 (1000 TP) / 3.7 (2000 TP) / 4.5 (3000 TP) Skillchain properties: Transfixion, Scission Sonic Thrust is a great Weapon Skill, if you can get into the proper positioning requirements to hit multiple targets. It is not a circular area of effect attack, but a frontal attack with an area of effect 3' wide and 10' long. Its Scission Skillchain property works particularly well with Stardiver's Transfixion Skillchain property: Going Stardiver into Sonic Thrust creates a Distortion Skillchain (let's not discuss why adding light and earth results in a combination of ice and water...), which then can be used to close Darkness with another Stardiver. |
 |
7. Gear Sets
I'm refraining from providing exact accuracy numbers for gear sets, because they are highly dependant on merits (Polearm, DEX) and even player races. Also, due to Dragoon's high native accuracy, I will only provide two TP sets: one for high accuracy requirements and one for what you may know as "mid-accuracy" and "low-accuracy" requirements.
7. 1. Gear Sets For Ryunohige
TP (AM3 down)This set is specifically designed for situations where you have enough buffs to cap delay reduction without having 25% Haste in gear, thanks to /SAM and Hasso. For "high accuracy" requirements, refer to
|
Low/Mid accuracy ItemSet 328851 |
TP (AM3 active)AM3 "devaluates" multi-attack gear a bit, so we pretty much swap out atheling mantle for rancorous mantle and windbuffet belt for sweordfaetels +1.
|
Low/Mid accuracy ItemSet 327933 |
High accuracy ItemSet 327934 |
Max accuracy ItemSet 328853 |
JumpsRyunohige forces Jump and High Jump to deal a critical hit, so lancer's cuissots +2 and Huginn gambieras are superior.
|
|
7. 2. Gear Sets For Gungnir
TPGungnir's high accuracy lets us use more multi-hit gear while still fulfilling accuracy requirements. The Low/Mid accuracy set does not change at all, except for having Accuracy +40 now, but you are free to use more damage-oriented items like Ganesha's mala over accuracy-oriented options.
|
Low/Mid accuracy ItemSet 327936 |
High accuracy ItemSet 327937 |
Max accuracy ItemSet 328853 |
7. 3. Gear Sets For Returning Players
TP (no Delve, no Bayld)This set is for basically anyone who just came back to the game, and hasn't participated in Adoulin content before. Once you have the amount of RoE points needed to obtain everything, join up in events such as SKCNM battles to obtain 109 AF/Relic reforged paper. |
ItemSet 327973 |
TP (no Delve clears)Basically with this set you may have taken a break right at the beginning of the introduction of delve, while people were plasma farming by fighting fodder mobs but no Mega boss clear. Also if you have some bayld stored from farming reives. |
ItemSet 327974 |
7. 4. Other Gear Sets
TPThese sets assume you are not having native Store TP. If you choose to be on a Samurai sub job, that native Store TP allows you to use duplus grip (or pole grip) over bloodrain strap. That also lets you use xaddi mail over lancer's plackart +2.
|
Low/Mid accuracy ItemSet 327957 |
High accuracy ItemSet 327958 |
Max accuracy ItemSet 328853 |
Camlann's TormentIf you cannot obtain the current earring combo bladeborn earring + steelflash earring are really good swaps.
|
Low/Mid accuracy ItemSet 327945 |
High accuracy ItemSet 327946 |
DrakesbaneHuginn gambieras and lancer's cuissots +2 each increase critical hit damage by 10%. Cizin greaves +1 (or Cizin greaves) with Critical hit rate +2% can be used, if you don't have Huginn gambieras. The Greaves even pull ahead at 1000 TP.
|
Low accuracy ItemSet 327942 |
Mid accuracy ItemSet 327943 |
High accuracy ItemSet 327944 |
Sonic ThrustSince gathering a bunch of mobs to use Sonic Thrust on usually means those mobs are not too tough, there is no real reason to have a high accuracy set for Sonic Thrust, I suppose...
|
Low/Mid accuracy ItemSet 327947 |
StardiverStardiver mirrors fTP on all hits, so elemental belts and gorgets are clearly superior to their competition. Because of Stardiver's fTP progression, moonshade earring adds a straight 0.125 to fTP, making it the best earring to pair with brutal earring for this Weapon Skill.
|
|
JumpsJumps are instant attack rounds that can multi-hit, but being job abilities, they are subject to job ability delay instead of attack speed reduction. Therefore, you can neglect any form of Haste and focus on stacking multi-attack and relevant stats like Store TP.
|
|
Misc.These sets are pretty much self-explanatory, I guess. |
|
8. Resources
Now that I'm almost done... I'll just
Spellcast
FAQ: Please refer to the Windower Support Forums and the BG Spellcast Help Thread for help with any problems you might run into.
If you have a SpellCast file you'd like to share and have posted on this guide, feel free to PM me or respond to the thread with it.
GearSwap
Please refer to the BG or FFXIAH threads for any questions or bug reports.
If you have a GearSwap file you'd like to share and have posted on this guide, feel free to PM me or respond to the thread with it.
This guide was made because of the dedication of comprehensive information that other Dragoons have put out here on FFXIAH and other websites that made creating this a smooth process, and I hope that it will continue to grow with the help of the AH community and foster a better understanding of the job. I would love to thank Martel for accepting and replying to multiple PMs i have sent him! I've personally learned a tremendous amount of information over the last couple of months in regards to Dragoon that came directly from him! I more than likely could not have finished this project without the conversations that i had with him beforehand. Would also like to thank my great friend Skudo of Carbuncle server Thanatos Linkshell! Who was the brains behind this operation lol. My Linkshell members and friends who took the time to proof read as best they can. The contributors at BGWiki and Wikia for giving me the foundation for much of this, and the FFXIAH community for inspiring me to learn more about this job and the game in general. If you notice any errors that need correcting and we miss your post feel free to PM Legato or Skudo and we'll address it as soon as we have time. Thank you!
p.s. Thank you very much to Ejiiin, Prothescar, Esor of Odin and the other creators/authors of FFXIAH "How to" guides, For giving us a base to work with and emulate.